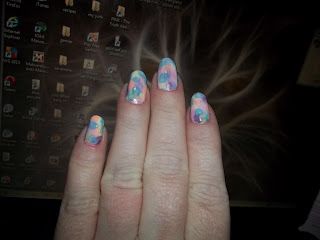
I have seen a lot of nail art bloggers post watercolor manis and I just love the way the colors look together so I thought I would give it a shot. I watched a few videos and read a few tutorials and this is what I came up with.
Before starting to polish it is important to gather all of your supplies for this mani. I used all of the polishes in the photo along with a paper plate, a cup with some acetone in it and a nail art brush. Instead of a paper plate you could use foil or an artist's palette. I just used what I had on hand. I have an artist's palette on order..can't wait to get that!!
Oh and btw...I learned that acetone and plastic cups don't get along so well LOLOL. I have no clue why I didn't know this already. I'm still giggling...check out the pictures and you'll see why....
The acetone literally ate the bottom out of the cup LOL. I was seeing drips coming from the cup so I ran to the kitchen to get a coffee cup. By the time I got back which was all of about 15 seconds every bit of the acetone was all over my table and the cup...well you can see the remnants LOL.
Now that I have shown my inner blonde, on to the good stuff...
I started with my old stand by base coat Nail Tek II Intensive Therapy. Then I used 2 coats of Essie Marshmallow as the base color and 1 coat of INM Out the Door top coat on top of that. The top coat protects the base color since you are using acetone...you don't want the acetone to take off the base color.
Once that was dry I started on the colors. I used one color at a time. I placed several drops of polish in a puddle on the paper plate followed by putting several drops of acetone and mixing it until I got the consistency I needed. I didn't use any specific order with the colors, I just went randomly. After getting the first color mixed I put 2 spots of that color on all of my nails and I continued this process until I used all of the colors and I was satisfied with the coverage.
You can always add more polish or more acetone directly to your nails in order to get the look you are after. I wanted this to be just a little more washed out than how it turned out (I forgot to take a picture) so I added a coat of Essie Marshmallow on top. It is a sheer polish so it worked perfectly. I then sealed the mani with 1 coat of INM Out the Door top coat. If you get any polish on your skin just use a nail brush and some acetone to clean it right up. I also like those Q-tip Precision Cotton Swabs if the nail brush can't get it all.
One thing I want to point out, on my middle finger the polish kind of smeared when I put the top coat on. In the photos you can see the purplish brush strokes, but since the mani is so random with the colors and placement and all I just went ahead and left it as it was.
The polishes I used (in the order of the photo) were...
Nail Tek II Intensive Therapy
INM Out the Door Fast Drying Top Coat
Essie Marshmallow
Essie Coat Azure
Sally Hansen Coral Reef
Sally Hansen Bubblegum Pink
Sally Hansen Disturbia
Sally Hansen Hard Lemonade
Sally Hansen Mint Sprint
China Glaze Papaya Punch
I hope y'all like this one as much as I do. Oh and btw...I did this mani on Feb 3rd and I still have it on today Feb 10th, a full week and it shows NO signs of wear at all!! Here are a couple of phots I just took...I can't believe how well this has worn!!!
This is my first go at laser striping. I had bought some striping tape a while back thinking that I would use it directly as the nail art itself. That didn't work out so well. So I decided to use it like you would use tape in a mani. I put on 2 coats of Nail Tek II Intensive Therapy as the base coat. Then I started out with a base color of Nicole by OPI Gold Shoulder. The color looks more silver or platinum instead of gold so I'm not sure where the name came from lol.
I then added some blue dots to 2 nails on each hand using acrylic paint pens and I put some Poshe top coat on all of my nails and let it dry.
I then put two strips of striping tape on the other nails one nail at a time and once I was happy with the placement I polished with NYC Skin Tight Denim which is a gorgeous deep blue and immediately ripped off the striping tape. It is important to do this one nail at a time so that you can take the striping tape off as soon as the polish is used. If you let it dry too much the lines won't be straight and there will be mistakes. Not to say that there aren't any mistakes otherwise lol. I had to redo one nail because it got messed up when I put top coat on too soon.
Speaking of top coat, you need to let your nails dry for a short bit before you put the top coat on so that the lines will be set and not smear. I used INM Out The Door on top of all of my nails once I was done with the designs. Hope you like them!
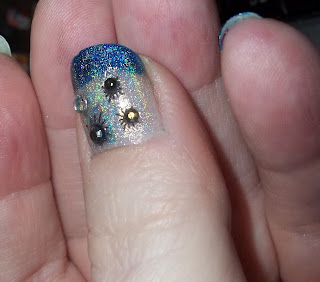
I loved the blue holo polish that I used on the last post so much that I used it again on this mani. I had gotten some snowflake nail art stickers on Ebay and wanted to use them and thought the blue polish would make a great backdrop. I was right. They looked really pretty. I used the Royal You polish on top of Nail Tek II base coat/ridge filler. Once I placed the stickers I topped everything with Poshe top coat.
I decided that I wanted to add a little more sparkle so I added one coat of China Glaze Fairy Dust.
Look at that sparkle!!! I hope you like the mani as much as I did. I hope everyone has a happy and prosperous new year!
I wanted to do a wintery look so I used some polishes that I picked up from Pretty Polish n Things on Etsy. She has a great deal going, 3 holo polishes for $25 which is what I purchased. I picked Ruby Slipper, Royal You, and the Holo Top Coat.
For this mani I used Nail Tek II Intensive Therapy for the base. Once that was dry I put 2 coats of the Holo Top Coat and free handed Royal You above the smile line then added another coat of the Holo Top Coat so that the linear holo would be blended. I sealed it with INM Out The Door.
I just love the glitter and shimmer of the holographic polishes. These are linear holos too which are my favorite. I love the scattered holos too but the linear just have that BAM!! lol Here is a blurry shot to show the pretty rainbow effect of the holo.
I wanted to try out my new stamper that I got on Ebay. In the past I haven't had any luck with stamping at all. This time it did ok. I want to practice more but I was pretty pleased with this lol. I used China Glaze Liquid Leather for this.
Then I added a few rhinestones. This is a first for me. I bought the rhinestones a while back but hadn't had the opportunity to use them. I'm not sure how I feel about them. I think I should have used the smaller ones. =/
Oh well, it's all in fun right? lol. I want to figure out a different mani to do with the rhinestones. When I do I'll post it. Any suggestions?
Ok so I really stink at needle marble nail art but I just had to give it a shot using the candy cane colors that I saw it on another blog somewhere. It looks really really bad but here it is.......
See...horrible lol.
It started out with just 2 accent nails.....
It looked ok...not great but doable. But I just couldn't leave well enough alone lol. Typical me...I had to screw it up lol. Oh well...live and learn lol.
So here is how I did it...
I put Nail Tek II base coat/ridge filler on my nails and once it dried I used Salon Perfect Snow Flurry which is an absolutely gorgeous sparkly white polish...I wish the camera would have picked up the sparkle. For the stripes I used the no name liner/brush squirt bottles in red and white..these are the same liners that I used on my last post. Then I used a small dotting tool to do the needle drag technique. I sealed it with INM Out The Door Top Coat.
Maybe one day I'll figure out what I am doing wrong so I can make this look as pretty as I have seen on other blogs. Fingers crossed!!!!
Merry Christmas everyone.
I love seeing Christmas lights every year. There are two streets near where I live that every house decorates. I drive to both streets every year. There is a neighborhood in the Houston area where almost the entire neighborhood decorates...it is absolutely amazing. The neighborhood is called Prestonwood Forest, I used to go out there to see all of the beautiful lights and displays. It is a bit of a drive from me now and since I am all alone I haven't been out there in a few years.
I figured I would put some lights on my nails so I could see the lights any time I wanted to lol. It is a very easy mani to do too. Start off with a base coat and when that dries take either a liner brush with black polish or you can use what I did which is a squirt type of liner polish. No brush was needed using it. Anyways, draw a curvy or loopy line on your nails for the cord. Let that dry and then grab all different colors to do the light bulbs. Apply the colors either with the same type of squirt polish liner or you can use a liner brush or even a dotter. Once that dries and your nails are really colorful put on a top coat. I chose to add a glitter top coat and then a regular top coat to seal it.
The products I used are
Nail Tek II base coat/ridge filler
A black liner squirt bottle (no name brand)
LA Colors Art Deco Nail Art Lacquers in blue, red, orange, yellow, pink, purple, and white.
China Glaze Fairy Dust
Poshe Top Coat
A short liner brush and nail polish remover to clean the brush between colors.
Here is a pic of the squirt bottle nail art polishes I use...I purchased them on Ebay really cheap. They can be used as a squirt bottle for very thin lines or open it up and use the brush that is inside. Taped to the bottom of the bottle is a really tiny really thin wire that is used to unclog the squirt part. These come in creme colors and glitters.
Here is a pic of LA Colors Art Deco Nail Art Lacquer which I purchased at Family Dollar. These come in creme colors as well as shimmers and glitters.


